Month: February 2023

Orthomosaics: How to Produce High-Quality Orthomosaic Maps

For many applications, normal aerial photos don’t provide the level of accuracy required for measurement and comparison because of the distortion of the lens angle and other factors. Using orthomosaics allows you to get a more accurate representation of the area you are studying.

What is an orthophoto?

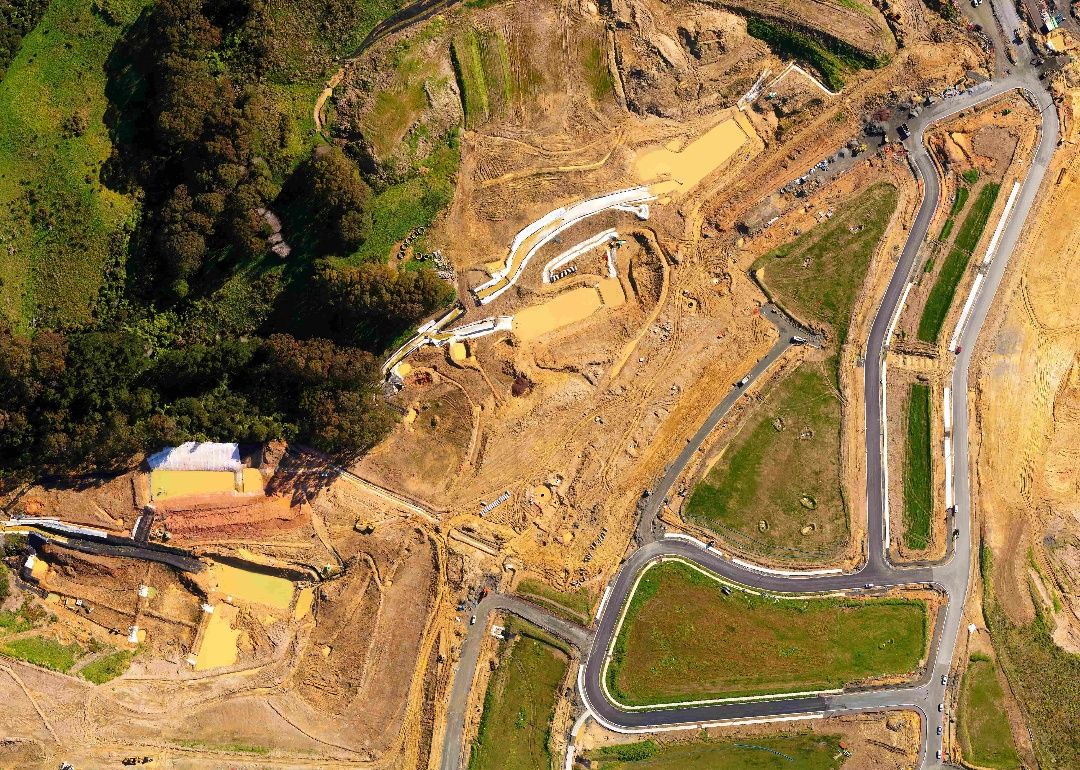
An orthophoto is an aerial image that has been corrected to account for distortions from topographic relief, lens distortion, and camera tilt through the process of orthorectification. The result is an accurate, maplike view from directly above, but instead of a drawing, it’s made from actual images.

What is an orthomosaic map?

An orthomosaic map is a distortion-free representation of an area that’s true to actual geography and can be used to measure accurate distances between points. These maps have a number of use cases in a variety of industries, including real estate, law enforcement, agriculture, construction, and environmental conservation.

To create an orthomosaic map, a series of 2D orthophotos are “stitched” together into a composite image, using overlapping areas of the images as reference points, so the final map is an accurate representation of real-world conditions.

What are some common issues with orthomosaic maps?

With unmanned aerial vehicle (UAV) technology, creating an orthomosaic map should be relatively simple and ideally shouldn’t involve more than setting a flight path, then collecting and processing images. However, without proper planning and execution, some common challenges can arise:

  • Not enough overlap: Without proper overlap between images, processing software can’t produce a complete map, resulting in gaps, inaccuracies, and distortion.
  • Low detail: Low-quality or out-of-focus cameras, poor lighting, and poor weather conditions can produce blurry images, vignetting, and other distortions.
  • Irrelevant images: Nonessential views that aren’t captured from a consistent angle or altitude (e.g., awkward takeoff and landing images or images that are too far outside your target area) risk introducing ambiguity into your map.

How do you capture images for a high-quality orthomosaic map?

A high-quality orthomosaic map starts with a well-planned, well-executed flight. Let’s go over some best practices you can follow to ensure that your images produce better orthomosaic maps.

Image Collection

Collecting drone images is the first step in creating high-quality orthomosaics. By using flight planning software such as Mapware Fly, you can capture images that meet the necessary specifications and seamlessly send them to the photogrammetry software that creates orthomosaics.

Altitude and Speed

Lower altitudes allow for more detailed images, which means the final map will contain more visual information. However, low altitude combined with high speed can create blurry images that are difficult for processing software to stitch together.

Remember, altitude needs to be set as the distance above the object of interest, and that can change during the course of a flight depending on the height of various buildings or landscape features. Your flight control app should adjust for different heights present in a scene with a distance-to-subject setting (rather than a distance-to-ground setting).

The ideal speed and altitude will vary by landscape, drone model, and camera, so conduct tests to determine the best combination for each particular project.

Image Overlap

As a rule of thumb, plan for at least 70 percent image overlap, but consider the level of detail required for your project—in some cases, you need 80 percent or 90 percent overlap, and in others, you can get away with 60 percent.

The more overlap, the more data points the software can use to create a composite map, and the more accurate it will be. 

However, depending on the software you’re using, an excess of images could slow down processing time. You don’t want to end up in a position where you’re manually choosing which photos to upload in order to speed up the process.

Image Angles

Images for orthomosaic maps should be taken at the nadir. That means the camera is pointed straight down, and the field of view intersects at a perpendicular angle with the ground or object below. 

When an image is non-nadir or oblique, it means that the camera is pointed at an angle to the ground. In the case of UAV photography, taking photos while the aircraft is mid-turn will result in non-nadir images that show a slightly different angle than the others. 

If you capture a non-nadir image in place of a nadir image, that distorts the final map, reducing accuracy. You should take non-nadir images in addition to nadir images to provide a more detailed composite, especially when creating 3D maps or mapping vertical structures.

To avoid unintentional non-nadir images, plan your flight path with turns in mind—you want to capture images once the turns are complete and the aircraft has returned to the correct orientation.’

Lighting and camera settings

Always test your camera settings (contrast, shutter speed, aperture, exposure, and so on) to determine the best configuration. Pay particular attention to the brightness and contrast qualities of the light that’s shining on the objects you’re photographing.

Make sure to control for different situations, such as time of year, time of day, and weather, because these factors can all affect lighting.

For example, the position of the sun in the sky at certain times of day changes throughout the year, which will affect shadows. Long shadows create distortion, and images taken in the early morning or evening will present the biggest lighting challenges.

Overcast conditions, with some cloud cover to prevent glare and reduce shadows, tend to produce good results.

How do you choose the best software for processing orthomosaic maps?

There are several software solutions out there that can help you convert raw data into orthomosaic maps. 

When choosing which software is right for your product, consider the following:

Speed

Some drone mapping software platforms run on-premises, while others run in the cloud. On-premise mapping engines will only be able to work as quickly as your hardware can handle, so for many users, cloud-based solutions make the most sense. 

But not all cloud-based mapping platforms are created equal. Depending on the underlying technology and the quality of the data center, the difference in processing speed between one cloud-based platform and another can be dramatic. Look for a solution that operates on highly rated data centers and uses technology such as graphics processing unit acceleration to speed up processing.

Accuracy

Even with excellent images that follow all of the tips described above, producing a highly accurate orthomosaic map depends largely on the tools made available through your mapping software. Look for a solution that offers accuracy tools such as ground control points and scale constraints.

Stability

When processing a large map, the last thing you want is for the system you’re using to crash or receive an error. This can lead to major headaches, especially if you’re working on a deadline. Look for a platform that can guarantee uptime and stability to minimize this kind of hassle.

Upload Limits

Need to process a very large map? Make sure the platform you’re using doesn’t impose limits on the size or number of images you can upload. If they do, you might end up having to sacrifice quality or upload your data in batches.

User-Friendliness

Finally, you’ll want to choose a platform that’s easy to learn and use. This applies to creating maps as well as managing, using, and sharing them.

Ready to produce your own orthomosaic maps?

High-quality orthomosaic maps unlock incredible possibilities for all kinds of organizations. Following best practices for altitude, speed, image overlap, angles, and camera settings can go a long way, but you also need the right software to process and stitch together images quickly and accurately.

learn how the public sector drives innovation with geospatial intelligence and data driven mapping ebook

Turning Drone Photogrammetry into Orthomosaic Maps

Drone photogrammetry is growing in popularity as more industries discover the value that 3D orthomosaic maps create for their internal teams and their customers. Despite this emerging visibility, many people are still unsure about what goes into an orthomosaic map and how to generate one.

In this post, we’ll explain how to use drone photogrammetry to create orthomosaic maps and address some updated best practices to help you get the results you want.

What is an orthomosaic map?

Orthomosaic maps offer a photorealistic representation of an area that can produce surveyor-grade measurements of topography, infrastructure, and buildings.
Each orthomosaic map is made up of dozens of orthoimages (also called orthophotos). An orthoimage is an extraordinarily detailed aerial photograph that is pinned to a geographic position to create continuity and uniformity when sequenced by mapping software. A dataset made up of numerous orthoimages is collected with detailed documentation on their geographic position and any external factors that could impact the collected data.

To produce a uniform scale, orthoimages are normalized for factors including altitude, lens distortion, camera tilt, and environmental conditions such as humidity. Once they’re corrected, the images can be stitched together with advanced mapping software to produce a 2D or 3D orthomosaic map.

What makes orthomosaic maps unique?

More than just a tech-savvy atlas, cutting-edge orthomosaic maps can be used to document changes in local vegetation or landscape over time, which can be helpful in a number of use cases, including environmental monitoring, emergency response, and much more.

They are detailed enough to measure distance, height, and depth on land masses and human-made structures, which allows users to instantly source accurate on-the-ground conditions and information from anywhere in the world.

This emerging technology is especially valuable for industries that monitor, secure, and maintain infrastructure in distant, often very isolated rural locations—telecommunications, utilities, and oil/gas, to name a few.

What’s the difference between photos and orthophotos?

A normal aerial photo that has not been orthorectified has a perspective view. This means that you can see objects from an angle—not directly from above. With every image collected, the perspective changes, which makes it impossible to stitch the photos together to get a cohesive view. 

An orthophoto has been corrected to account for the camera angle, so the view is directly from above, no matter where an object is located in the image. This consistent and more accurate view allows orthophotos to be combined to create a larger map.

Where are orthomosaic maps used?

Applications for orthomosaic maps are limited only to the imagination. Several industries have readily adopted drone mapping technology to create orthomosaic maps.

Surveying

Perhaps the most natural fit for drone mapping is surveying, the technique for determining the 2D or 3D locations of points and the distances and angles between them. Surveyors can use aerial orthomosaic maps to:

  • Measure roofs.
  • Create topographic maps.
  • Complete land surveys.
  • Map property lines.
  • Generate site maps.

Agriculture

Farmers and agriculture companies have adopted drones as another tool in the toolbox for reducing their environmental impact, optimizing production, and more:

  • Monitor crop health.
  • Oversee livestock.
  • Measure soil temperature and moisture.
  • See land changes over time.
  • Precisely apply pesticides and herbicides.

Public Safety

Federal, state, and local public safety officials use drone photogrammetry in both proactive and reactive ways:

  • Identify emergency evacuation routes.
  • Gather information remotely.
  • Find hot spots in forest fires.
  • Respond to natural disasters.
  • Monitor traffic patterns.

Collecting orthoimages with drone photogrammetry

Traditionally, aerial photography was performed by manned aircraft or distant satellites, each of which has shortcomings. For example, airplanes and helicopters are highly susceptible to environmental conditions and human error, while satellite technology is prohibitively expensive for most firms.

UAV technology allows users to carefully map out flight plans and capture high-resolution images with minimal distortion. The ease of use and extraordinary mobility of unmanned flight makes high-quality data collection simple, safe, and accessible. Drones have also lowered the bar of entry with regards to cost, which is driving an explosion in research and innovative new use cases.

The importance of a flight plan

Producing high-quality orthomosaic maps involves detailed flight planning and data organization. When developing a flight path for a project, you need to prioritize three key factors:

  • High-resolution imagery – Images collected need to be sharp, well-timed, and properly normalized. Low-quality images can lead to blurry images, vignetting, and other distortions.
  • Adequate overlap – An average orthomosaic map requires overlap of around 70%, though some projects necessitate more. Overlap ensures there are no gaps or inaccuracies in your data.
  • Relevant images – Nonessential views can introduce ambiguity and distortion into your map. Data sets should not include images from takeoff and landing, nor should off-angle shots taken during turns be used.

Thanks to advanced mobility and hovering, creating a tightly managed flight plan using a UAV drone makes curating high-quality images with consistency and proper alignment easier than ever.

Creating data about data

It’s not just the images themselves that make an orthomosaic map work. Metadata collected alongside each image allows processing software to build an accurate schematic from dozens or even hundreds of unique images.

In this context, metadata is a collection of data-encoded notes that are pinned to images to organize them along a flight path. It ties the image to a GIS location and provides context into other factors that may influence data normalization, such as time/date, focal length, resolution settings, and weather conditions.

Metadata should also document who created a data set and under what conditions, both factors that may influence whether data is appropriate for an orthomosaic map. Without accurate metadata, any aerial photographs collected or maps created aren’t reliable.

Turning orthoimages into orthomosaic maps

Going from a catalog of digital images to a fully dynamic 3D experience requires advanced digital processing. The tools you select will impact the quality of the map created, and unfortunately not all photogrammetry software is up to the challenge.

When shopping for a photogrammetry processing software, here’s what to look for:

  • Speed – Data processing should be fast enough to not get bogged down in large data sets. Be sure to examine the technical specifications of the hardware (on-prem servers and hardware or the cloud provider’s data center, for example) as well as the software.
  • Upload limits – The size of your mapping project should be limited by only your imagination. Look for cloud-based photogrammetry software like Mapware that can scale to meet project demands. 
  • Accuracy – Software shouldn’t introduce external distortion to data sets with poor GIS accuracy and data management practices. Accuracy tools like ground control points (GCPs) and scale constraints help to ensure the quality of your final product. 
  • Stability – Nothing is quite as frustrating as when software crashes and your work is lost. Any photogrammetry software should guarantee uptime and error prevention. 
  • User-friendliness – Creating 3D maps doesn’t have to be difficult. Find a software solution that is user-friendly when it comes to creating maps and storing, sharing, and using them.
  • Pixel size: Smaller pixels mean better accuracy. Make sure the solution you choose has the resolution you need to meet your project goals.  
  • File options: Integrating photogrammetry into your workflow means you have to produce files that are compatible with other software. Look for software that has the export formats that work for you.

Get started with Mapware!

Mapware is powerful photogrammetry software designed by experts in the field of drone-mounted photogrammetry. It’s designed to process your images and data faster than ever, all from an easy-to-use platform.

As more innovative use cases are developed, more industries are discovering the full potential of drone photogrammetry. As drone technology advances and data and imaging software improves, the horizons of what this powerful technology can do will only grow.

Ready to put Mapware to work for you? Start a free trial today!

learn how the public sector drives innovation with geospatial intelligence and data driven mapping ebook

This post was originally published on September 4, 2020 and was updated on February 9, 2023.